1.13 P
1.13.1 Paging
An extension user can make a voice announcement to several people at once.
|
| The announcement is heard through the built-in speakers of proprietary telephones (PTs) and/or external pagers (loudspeakers) which belong to a paging group. Up to two external pagers can be connected. |
| The paged person can answer the page from a nearby telephone. |
| It is possible to page with a call on hold in order to transfer the call. |
Paging Deny
It is possible to deny being paged on an extension basis.
|
|
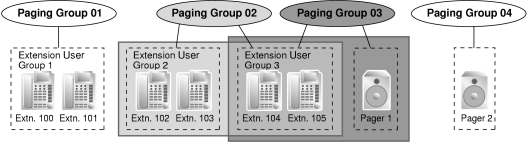
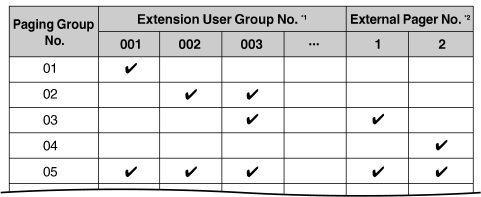
Paging Group
|
Each paging group consists of extension user groups and external pagers. One extension user group or external pager can belong to several paging groups.
(→ 1.7.1 GROUP FEATURES)
|
|
[Example] |
|
|
|
[Programming Example] |
|
|
 : : |
|
|
|
|
|
|
|
|
|
|
| • |
Extensions which cannot be paged are: |
|
| – |
Portable stations (PSs) |
| – |
Single line telephones (SLTs) |
| – |
Ringing or busy PTs |
| – |
PTs in Paging Deny mode |
| – |
PTs in Paging DND mode |
| – |
IP-PTs connected to a V-IPEXT card, that are assigned to extension user group 31 (default)* |
|
|
| These extensions cannot be paged, but can answer a page. |
|
|
|
|
| Changing the extension user group of the extension, allows it to receive pages. However, doing so may affect the number of simultaneous IP extension and IP CO line calls available on the IPCMPR card. |
|
|
| • |
External Pager Priority
External pagers can be used with the following priorities:
Trunk Answer From Any Station (TAFAS) → Paging → Background Music (BGM)
(→ 1.17.2 TAFAS (Trunk Answer From Any Station), 1.2.1 BGM (Background Music)) |
| • |
Volume Control
The volume level of pages heard from PTs and external pagers can be changed through system programming. |
| • |
Paging DND
When Do Not Disturb (DND) (→ 1.4.10 DND (Do Not Disturb)) is set for incoming calls, it is programmable whether an extension receives paging through system programming. |
1.13.2 Paralleled Telephone
| By connecting telephones in parallel, you can increase the number of telephones connected to the PBX without adding additional extension cards. |
| Both wired and wireless telephones can be connected in parallel. Single line telephones (SLTs), analog proprietary telephones (APTs), and digital proprietary telephones (DPTs) can be connected to other telephones or connectors, allowing up to three telephones to be connected to the PBX through just one extension port. Additionally, portable stations (PSs) can be linked to other telephones wirelessly and used as "paired" extensions. |
| The different type of parallel connections are described below. |
|
Features |
Descriptions |
Connections | |
|
Allows an SLT to be connected to an APT or DPT which is connected to a Super Hybrid port of the PBX.
When parallel mode is enabled, the two telephones function as follows: |
| • |
Both share the extension number of the telephone connected directly to the PBX (main telephone). |
| • |
Either telephone can make or answer a call. |
|
| |
|
| Allows an SLT to be connected to a DPT which is connected to a Super Hybrid port of the PBX. |
| Unlike parallel mode, XDP mode allows each telephone to act as an independent extension with its own extension number. (→ 1.5.7 Extension Port Configuration) |
|
| |
|
| Allows a DPT to be connected to another DPT which is connected to a DPT port or a Super Hybrid port of the PBX. The DPT that is connected directly to the PBX is called the “master DPT”, and the DPT connected to the master DPT is called the “slave DPT”. |
| Similar to XDP mode, each DPT acts as a independent extension with its own extension number. |
| If a master DPT is connected to the PBX by a Super Hybrid port (not a DPT port), a third telephone (SLT) can also be in parallel or XDP mode with the master DPT. |
| Digital XDP connection allows the number of DPTs that the PBX supports to increase. |
|
|
| Wireless XDP Parallel Mode |
|
|
|
|
|
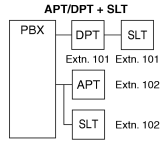
[APT + SLT]
|
| • |
If one telephone goes off-hook while the other is on a call, a three-party call is established. If one user goes on-hook, the other user continues the call. |
| • |
An extension user cannot originate a call from the SLT if the APT is: |
|
| – |
playing background music (BGM) |
| – |
receiving a paging announcement over the built-in speaker. |
|
| • |
The SLT will always ring for incoming calls (if its ringer is turned on). It cannot be programmed to not ring. |
|
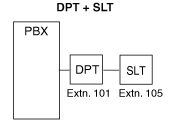
[DPT + SLT]
|
| • |
When in the parallel mode, XDP mode of the Super Hybrid port should be turned off through system programming. |
| • |
Whether the SLT rings for incoming calls is programmable. |
|
| Ring on: Both telephones ring when a call is received, except for when the digital proprietary telephone (DPT) is in Hands-free Answerback mode (→ 1.8.1 Hands-free Answerback) or voice-calling mode (Alternate Receiving Ring/Voice) (→ 1.9.13 Intercom Call). |
| Ring off: Only the DPT rings when a call is received, however, the SLT can be used to answer the call. |
|
| • |
Both telephones cannot engage in calls simultaneously. If one telephone goes off-hook while the other is on a call, the call is switched to the telephone that goes off-hook. Note, however, that the call will not be switched when the telephone is: |
|
|
|
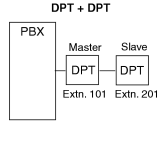
[DPT + DPT]
|
| • |
Available Telephones
KX-T7600 series, except KX-T7640 |
| • |
The PSU-M or PSU-L must be installed when Digital XDP connection enables the number of DPTs to exceed the maximum capacity that the PBX supports. |
| • |
The following features cannot be used on either the master or slave DPT: |
|
| a) |
OHCA: A call waiting tone will be heard even if the OHCA feature is set. |
| b) |
USB Module: The DPTs will not function properly if a USB Module is attached to either DPT. Do not connect a USB Module to either of the DPTs. |
|
|
Note
|
To cancel a Digital XDP connection, disconnect the slave DPT from the master, then disconnect the and reconnect the master DPT to the PBX. |
|
|
[DPT + DPT + SLT]
|
| • |
When an SLT is connected to the slave DPT in parallel mode, the SLT acts as a parallel extension of the master DPT. If connected in XDP mode, the SLT acts as an independent extension. |
1.13.3 Password Security
To maintain system security, system passwords are required to access certain programming functions of the PBX. By giving different users access to different passwords, it is possible to control the amount of programming that each user is able to perform.
The following types of system passwords are available: |
|
Password |
Description |
Format | |
|
| System Password (PT) for User |
|
| Used to access user-level PT programming. The specific PT programming items that may be programmed at user level can be selected through system programming item. |
|
|
| System Password (PT) for Administrator |
|
| Used to access administrator-level PT programming. All PT programming settings are available. |
| |
|
| System Password (PC) for User |
|
| Used with the user-level programmer code to access user-level PC programming. The installer can specify which system programming settings are available. |
|
|
| System Password (PC) for Administrator |
|
| Used with the administrator-level programmer code to access administrator-level PC programming. The installer can specify which system programming settings are available. |
|
| System Password (PC) for Installer |
|
| Used with the installer-level programmer code to access installer-level PC programming. All system programming settings are available. |
|
|
| Warning to the Administrator or Installer regarding the system password |
| 1. |
Please provide all system passwords to the customer. |
| 2. |
To avoid unauthorized access and possible abuse of the PBX, keep the passwords secret, and inform the customer of the importance of the passwords, and the possible dangers if they become known to others. |
| 3. |
The PBX has default passwords preset. For security, change these passwords the first time that you program the PBX. |
| 4. |
Change the passwords periodically. |
| 5. |
It is strongly recommended that passwords of 10 numbers or characters be used for maximum protection against unauthorized access. For a list of numbers and characters that can be used in system passwords, refer to Section 1.1.2 Entering Characters in the PC Programming Manual. |
| 6. |
If a system password is forgotten, it can be found by loading a backup of the system data into a PC, and checking the password using the Maintenance Console software. If you do not have a backup of the system data, you must reset the PBX to its factory defaults and reprogram it. Therefore, we strongly recommend maintaining a backup of the system data. For more information on how to back up the system data, refer to the PC Programming Manual.
However, as system passwords can be extracted from backup copies of the system data file, do not allow unauthorized access to these files. |
|
1.13.4 Pause Insertion
Pressing a PAUSE button inserts a preprogrammed Pause time between digits of a user-dialed number before the number is dialed out, allowing certain numbers separated with a pause to be used to access certain features (e.g., access codes, seizing idles lines, etc.).
When a pause is needed, pauses must be inserted manually (pressing the PAUSE button) in all cases, except for the following access codes where a pause is automatically inserted between the user-dialed access code and the subsequent digits: |
|
|
| • |
The length of a pause is programmable for each CO line. |
| • |
Numbers stored in Memory Dialing can contain pauses. |
| • |
When a Second Dial Tone Waiting code is dialed after seizing a CO line, a preprogrammed number of pauses are inserted after the code. |
| • |
ARS
A pause is not automatically inserted between the user-dialed access code and the subsequent digits when the ARS mode is enabled. (1.1.3 ARS (Automatic Route Selection)) |
1.13.5 PC Console/PC Phone
CTI First Party Call Control can be conducted by connecting a PC with a KX-T7633 or KX-T7636 DPT (equipped with USB module KX-T7601) through USB ports. By using the KX-TDA0350 PC Phone or KX-TDA0300 PC Console CTI application, users can enjoy many of the KX-TDE series PBX features while utilizing the benefits of a CTI solution. PC Console gives users access to certain administrative level features that are not available with PC Phone.
The extensions that use PC Console must be assigned through system programming.
Along with many KX-TDE PBX features, PC Phone and PC Console offer many specific features, including the following:
|
| • |
Phone Book:
A list of telephone numbers including detailed information pertaining to each entry. This feature allows the user to make calls and send e-mails to each entry. |
| • |
Outlook Integration:
The Microsoft Outlook Address Book can be integrated to be used with the PC Phone or PC Console. Outlook Address Book can be integrated to be used with the PC Phone or PC Console. |
| • |
Pop-up Screen:
An image containing information about the caller appears when a call is received. |
| • |
Voice Memo:
Conversations are recorded at any time and can be saved, sent by e-mail, etc. |
| • |
Text Memo:
A user can type a short message during a conversation which can be saved, sent by e-mail, etc. |
|
| [For PC Phone Only] |
| • |
TAM (Telephone Answering Machine):
If a call is not answered within a preprogrammed time, callers can leave a message after hearing a greeting message. |
| • |
Message:
TAM messages are played back and/or automatically transferred by phone or by e-mail. |
|
| [For PC Console Only] |
| • |
Incoming Group Screen:
Names, extension numbers, and the status (e.g., busy) of each extension can be monitored on a single screen. Calls can also be made and received on this screen. |
|
| • |
Hardware Requirements: KX-T7633 or KX-T7636 DPT and USB Module KX-T7601 |
| • |
System Requirements: |
|
| – |
Microsoft Windows XP or Windows Vista |
| – |
Internet Explorer 5.0 or later |
|
|
|
|
| – |
CPU: Intel Pentium II 350 MHz |
| – |
RAM: 64 MB |
| – |
HDD: 100 MB available space (when installing) |
| – |
Display: XGA (1024*768) |
| – |
Peripheral Devices: Sound Board (for recording and replaying features), Speaker (for listening to voice messages), USB port, CD-ROM drive |
|
1.13.6 PC Programming
| Although many PBX features can be programmed using a proprietary telephone (PT) (→ 1.13.30 PT Programming), a PC connected to the PBX can use the Maintenance Console software to program in further detail. System programming, diagnosis, and data upload/download can be performed either through on-site programming or remote programming. |
| 1) |
On-site Programming: Programming that is performed using an on-site PC connected directly to the PBX. |
| 2) |
Remote Programming: Programming that is performed using an off-site PC that connects to the PBX via a CO line.
|
|
| 1. |
Connection Methods for On-site Programming |
|
|
Method |
Description |
Required Hardware |
| Serial Interface (RS-232C port) |
|
| The PC is connected to the PBX via the Serial Interface (RS-232C port) of the PBX. |
|
| |
|
| The PC is connected to the PBX via the USB port of a USB Module KX-T7601 attached to a digital proprietary telephone (DPT). |
|
| |
|
| The PC is connected to the PBX via the MNT port of the IPCMPR card. |
|
|
Modem
(connected to SLT port)* |
|
| The PC is connected to a modem, which is then connected to an SLT port of the PBX. Use the modem to dial the floating extension number (default: 599) assigned to the analog remote maintenance feature to access the PBX. |
|
| RMT card and user-supplied modem |
|
|
|
|
| Remote access must be enabled through system programming when performing on-site programming via modem. |
|
|
|
| 2. |
Connection Methods for Remote Programming |
|
|
Method |
Description |
Required Hardware | |
|
Call the PBX and have the call directed to the floating extension number (default: 599) assigned to the analog remote maintenance feature using one of the following methods:
|
Direct Access: Using the off-site modem, dial a telephone number with the modem which will direct your call (via Direct In Line (DIL) or Direct Inward Dialing (DID) distribution) to the floating extension number assigned to the analog remote maintenance feature.
|
DISA: Using a telephone, dial a telephone number which will direct your call (via DIL or DID distribution) to a floating extension number used by the Direct Inward System Access (DISA) feature (→ 1.4.8 DISA (Direct Inward System Access)). Next, dial the floating extension number assigned to the analog remote maintenance feature. Then access the PBX with the modem.
|
| Call Transfer: Using a telephone, dial a telephone number which will direct your call to an operator (or other extension of the PBX) and request to be transferred to the floating extension number assigned to the analog remote maintenance feature. (→ 1.3.9 Call Transfer) Then access the PBX with the modem. |
|
| RMT card and user-supplied modem |
| |
|
| The modem is connected to the Serial Interface (RS-232C port) and also to either an extension port which is assigned as the DIL/DID destination, or to a CO line directly. AT commands can be sent to the modem automatically when it is connected to the Serial Interface (RS-232C port) and can be programmed beforehand, through system programming, to initialize the modem. AT commands can also be sent manually in the PT system programming mode. |
|
|
|
|
| • |
Only one system programming session is permitted at a time. Access will be denied when a second party tries to perform system programming, including system programming via a PT. |
| • |
Programmer Code and Password for System Programming
To access system programming, a programmer code and its password must be entered. For more details, see Section 1.13.3 Password Security. |
| • |
Remote Programming Limitation
It is possible to disable remote access through system programming. Disabling this feature will also disable the ability to perform on-site programming via modem. |
| • |
If an extension user sets Walking Extension at the same time that the extension's data is being programmed through PC programming, the data may not be transferred properly. (→ 1.20.2 Walking Extension) |
1.13.7 PDN (Primary Directory Number)/SDN (Secondary Directory Number) Extension
| Primary Directory Number (PDN) buttons and Secondary Directory Number (SDN) buttons are ideal for use between bosses and secretaries. When a call (intercom or CO) arrives at a PDN button on the boss's extension, the call will ring and the LED of the SDN button will flash at the secretary’s extension as well, indicating that an incoming call is arriving at the boss’s extension. In addition, caller information (e.g., Caller ID) of the incoming call will appear on the secretary’s extension. The secretary can answer the call for the boss by simply pressing the SDN button. Delayed ringing can be set for a PDN or SDN button. |
| A secretary can hold a call answered on the SDN button, and the boss can retrieve the held call simply by pressing the PDN button, like when answering a call with an S-CO button. In addition, a secretary can transfer calls from an SDN button or other button (e.g., S-CO button) to the boss’s extension with a simple operation, like when using a DSS button. |
| An extension can have several SDN buttons, each registered to a different boss’s extension. However, only one SDN button can be registered for a single boss at each extension. An extension can have up to eight PDN buttons. PDN buttons can simplify the use of an extension because both intercom and CO line calls can be made and received at a PDN button. |
|
Making Calls with an SDN Button
|
| When Standard SDN Key mode is assigned to an SDN extension (secretary) through COS programming, SDN extensions (secretaries) can make calls for PDN extensions (bosses) on the SDN button. For example, a boss can ask a secretary to make a call and put the call on hold, after which, the boss can retrieve the held call. |
| Through COS programming, it is possible to allow an SDN extension to make calls using the COS of the PDN extension. All other settings that are available when using the Walking COS feature are also applied (→ 1.20.1 Walking COS). |
SDN Direct Dial
An SDN extension can call a PDN extension or transfer a call to a PDN extension using an SDN button.
In this case: |
| – |
Only the PDN extension rings (i.e., other SDN extensions do not ring). |
| – |
The delayed ringing and DND settings of the PDN extension are ignored. |
|
|
| Depending on the mode selected through COS programming, SDN Direct Dial is performed in one of two ways, as follows: |
| – |
Enhanced DSS Key mode: pressing the SDN button once. |
| – |
Standard SDN Key mode: pressing the SDN button twice (a dial tone is heard the first time the SDN button is pressed). |
|
| Calls answered using the SDN button can be transferred to the PDN extension by simply pressing the SDN button once, regardless of the mode. |
|
LED Indication
|
| The LED patterns and the corresponding status of PDN and SDN buttons are as follows: |
|
Light Pattern |
PDN Button Status |
SDN Button Status | |
|
|
| The corresponding PDN extension is idle. |
| |
|
| The extension is on a call using the PDN button. |
|
| The extension is on a call using the SDN button. |
| |
|
| A call is on hold using the PDN button. |
|
| A call is on hold using the SDN button. |
| |
|
| • |
A call on a PDN button is on Exclusive Call Hold or consultation hold. |
| • |
The PDN extension is adding a member to a conference or using the line for an Unattended Conference, on a PDN button. |
|
| • |
A call answered using the SDN button is on Exclusive Call Hold or consultation hold. |
| • |
The SDN extension is adding a member to a conference, or using the line for an Unattended Conference. |
| |
|
| An incoming call is arriving at this extension. |
|
| Receiving Hold Recall or automatic callback ringing from a call answered using the SDN button. |
| |
|
| A corresponding SDN extension is: |
| • |
on a call. |
| • |
holding the line using Exclusive Call Hold or consultation hold. |
| • |
adding a member to a conference. |
| • |
using the line for an Unattended Conference. |
| • |
receiving Hold Recall or automatic callback ringing. |
|
|
| The corresponding PDN extension or another corresponding SDN extension is: |
| • |
on a call. |
| • |
holding the line using Exclusive Call Hold or consultation hold. |
| • |
adding a member to a conference. |
| • |
using the line for an Unattended Conference. |
| • |
receiving an incoming call directed only to the PDN extension (e.g., callback ringing). |
|
| |
|
| A call is on hold by a corresponding SDN extension. |
|
| A call is on hold by the corresponding PDN extension or another corresponding SDN extension. |
| |
|
| A call is arriving at an Incoming Call Distribution (ICD) group in Ring Distribution method that this extension is a member of. |
|
| The corresponding PDN extension is receiving an incoming call. |
|
|
| When multiple calls are on a PDN extension, the LED pattern that appears on the corresponding SDN buttons is displayed according to the following priority: |
| Receiving an incoming call → holding a call → on a call → idle |
| For example, if a PDN extension receives an incoming call while on a call, the LEDs on the corresponding SDN extensions will show the incoming call. |
| However, if an SDN extension is handling a call using the SDN button (e.g., on a call, has a call on hold, etc.), the status of that call will be displayed on the SDN button, regardless of the call status of the PDN extension. |
|
Example of a Secretary Handling Calls for Multiple Bosses
|
| The following example shows the LED patterns of the PDN and SDN buttons of each extension and how calls can be handled. |
| 1) A Call From 111-1111 Arrives at Ext. 101 |
|
|
| 2) The Call From 111-1111 is Answered by Ext. 103 |
|
|
| 3) The Call From 111-1111 is On Hold by Ext. 103 |
|
|
| 4) The Call Held by Ext. 103 is Answered by Ext. 101 |
|
|
| 5) A Call From 222-2222 Arrives at Ext. 101 |
|
|
| 6) A Call From 333-3333 Arrives at Ext. 102 |
|
|
| 7) The Call From 333-3333 is Answered by Ext. 103 |
|
|
| 8) The Call From 333-3333 is Transferred by Ext. 103 to Extension 102 |
|
|
| • |
A flexible button of a PT and a PS can be customized as a PDN or SDN button. A flexible button on a DSS Console can be customized as an SDN button. |
| • |
An extension can have up to eight PDN buttons. |
| • |
If none of an extension's PDN buttons are idle, the extension will not receive incoming calls, including Call Waiting. Therefore, it is strongly recommended for PDN extensions to have at least three PDN buttons. |
| • |
Through COS programming, it is possible to select whether extensions can create SDN buttons on their own extensions using PT programming. |
| • |
Up to eight different extensions can assign SDN buttons corresponding to the same PDN extension. |
| • |
When a PDN extension has an idle CO line button or ICD Group button, calls will arrive on the following buttons according to the following priority: |
|
| – |
Incoming intercom calls to an ICD group: ICD Group button → PDN button |
| – |
Incoming CO line calls: S-CO button → G-CO button → L-CO button → PDN button |
| – |
Incoming CO line calls to an ICD group: ICD Group button → S-CO button → G-CO button → L-CO button → PDN button |
|
| • |
When multiple calls of the same status (e.g., on hold) are on a PDN extension, the status of the newest call will be displayed on the corresponding SDN extensions. For example, if a PDN extension has two calls ringing, an SDN extension will answer the call that arrived at the PDN extension last, when pressing the SDN button. |
| • |
When a PDN extension is a member of an ICD group in Ring Distribution method, and an incoming call arrives at the ICD group, the incoming call status will not appear on the LEDs of the corresponding SDN extensions (→ 1.9.1 ICD GROUP FEATURES). |
| • |
If none of an extension's PDN buttons are idle, DSS buttons of other extensions registered to the PDN extension will turn on red. |
| • |
Ring Tone Pattern
Through system programming, each extension can set ring tone patterns for PDN buttons. Ring tone patterns can be assigned separately for each SDN button. |
| • |
Outgoing Line Preference
When "PDN" is selected as the outgoing line preference, outgoing calls will originate on the first available PDN button (→ 1.10.3 Line Preference—Outgoing). |
| • |
Incoming Line Preference
Through system programming, it is possible for only incoming calls arriving at PDN buttons to be answered simply by going off-hook, by selecting "PDN" as the incoming line preference (→ 1.10.2 Line Preference—Incoming). This prohibits calls that arrive on non-PDN buttons (e.g., an SDN button) to be answered when going off-hook. |
| • |
Walking Extension
For PDN extensions, the Walking Extension feature can only be used when all PDN buttons are idle (→ 1.20.2 Walking Extension). |
| • |
Wireless XDP Parallel Mode
If a PS has PDN or SDN buttons, Wireless XDP Parallel mode cannot be assigned to that PS (→ 1.20.5 Wireless XDP Parallel Mode). |
| • |
OHCA/Whisper OHCA
A PDN extension cannot receive OHCA or Whisper OHCA, unless the call is made using a corresponding SDN button (→ 1.12.3 OHCA (Off-hook Call Announcement), → 1.20.4 Whisper OHCA). |
| • |
Alternate Calling—Ring/Voice
It is not possible to temporarily change the called party's preset call receiving method (ring tone or voice) when calling a PDN extension, unless the call is made using a corresponding SDN button (→ 1.9.13 Intercom Call). |
| • |
The same delayed ringing setting is applied to all PDN buttons on an extension. Delayed ringing can be assigned separately for each SDN button. |
| • |
Through system programming, it is possible to select whether caller information (such as Caller ID) is shown immediately on a PS when a call is received while delayed ringing is set. |
| • |
Caller information (such as Caller ID) is not shown immediately on a PT when a call is received while delayed ringing is set. |
| • |
SDN buttons can be set to not ring (only flash) for incoming calls. However, this setting is not available for PDN buttons. |
| • |
The forward no answer timer starts when a PDN extension starts ringing. |
1.13.8 Peer-to-Peer Connection
| This PBX automatically establishes peer-to-peer communication between peer-to-peer compatible IP extensions (i.e., IP-PTs and SIP extensions). Non-peer-to-peer IP extension calls are routed through the DSP card. However, with peer-to-peer calls, the call is routed directly from one IP extension to another without going through a DSP card. In other words, peer-to-peer calls can be made without using the PBX's resources. |
| • |
Peer-to-peer calls can only be made between extensions connected to the PBX through the IPCMPR card. |
| • |
The following combinations of IP telephones are peer-to-peer compatible: |
|
|
|
 : : |
|
|
|
| • |
The types of CODEC available for peer-to-peer calls depend on the IP telephones being used, as follows: |
|
|
|
| The speech quality of the CODECs varies as follows: (High) G.722, G.711, G.729A (Low). |
| When the preferred CODEC of each party differs, the call will be established using the lower CODEC. For example, if the caller prefers G.711 while the called party prefers G.729A, the call will be established using G.729A. |
|
| • |
G.722 is only available for the KX-NT300 series IP-PTs and some SIP extensions that support this CODEC during peer-to-peer communication. |
| • |
Through system programming, it is possible to assign a specific type of CODEC to be used for each extension. |
| • |
For SIP extensions, the priority of the CODEC that will be used can be specified on a SIP extension basis. |
| • |
For non-peer-to-peer calls via the DSP card, calls cannot be made or received when all of the card's resources are being used. |
1.13.9 PING (Packet Internet Groper) Confirmation
| It is possible for this PBX to confirm the connection of IP telephones, routers, and hubs within or outside the private network using PING. The PBX will send a Internet Control Message Protocol (ICMP) echo request through the PC programming terminal and receive an ICMP message confirming connection. |
| • |
This PBX performs PING as follows: |
|
| – |
Test packet length: 56 bytes |
| – |
Ping attempts: 5 |
| – |
Time out length: 1 second |
| – |
Ping interval time: 1 second |
|
1.13.10 Power Failure Restart
| When the electricity is turned back on, the PBX restarts, loads its stored data automatically, and logs the event as a System Restart in the error log. |
1.13.11 Power Failure Transfer
If the power supply to the PBX fails, specific single line telephones (SLTs) are automatically connected to specific CO line (Power Failure Connections). The PBX will switch from the current connections to the Power Failure Connections, and all existing conversations will be disconnected.
Only CO line conversations handled by Power Failure Connections can be made during a power failure. |
| • |
Only CO line calls can be made during a power failure. All other features do not work. |
| • |
The analog CO line cards, extension cards, and the number of PFT ports (ports which can be used for Power Failure Connections) are as follows:
|
|
CO Line Cards: LCOT16 (4 PFT ports), LCOT8 (2 PFT ports)
Extension Cards: MSLC16 (4 PFT ports), CSLC16 (4 PFT ports), SLC16 (4 PFT ports), DHLC8 (2 PFT ports) and SLC8 (2 PFT ports) |
| Connect only one extension card to one CO line card. |
Note
|
Through system programming, it is possible to allow CO line calls that are established during a power failure to be maintained even when the power returns and the connection is switched back to the normal configuration from the Power Failure Connection. However, if no special programming is performed, the connection will be dropped when power returns. |
|
|
1.13.12 Predialing
| A display proprietary telephone (PT) user can check and correct the number to be dialed on-hook. The call will be initiated after going off-hook. |
| • |
Storing the Predialed Number in Personal Speed Dialing
The predialed number can be stored in Personal Speed Dialing by pressing the AUTO DIAL/STORE button. (→ 1.16.6 Speed Dialing, Personal) In this case, the extension will enter personal programming mode automatically so that a name can be assigned to the stored number. |
1.13.13 Printing Message
An extension user can select a message to be output on SMDR. Up to eight messages can be preprogrammed in the Printing Message table, and are available to all extensions connected to the PBX. A message can contain the "%" symbol, which requires a number to be entered in its place when the message is selected at an extension.
Depending on the content of the preprogrammed messages, this feature can be used to record a variety of information, which can be output on SMDR to, for example, a connected PC. |
[Example]
If message 1 is preprogrammed as "Started work", and message 2 as "Finished work", employees can sign in by selecting message 1 when starting work, and sign out by selecting message 2 when finishing. A connected PC can then be used to generate employee work records. |
| • |
Up to seven "%"s can be stored for each message. |
1.13.14 Privacy Release
| By default, all conversations which take place on CO lines, extension lines and doorphone lines are protected from others interrupting the conversation (Automatic Privacy). |
| Privacy Release allows a proprietary telephone (PT) or portable station (PS) user to suspend Automatic Privacy for an existing CO line call on the S-CO button in order to establish a three-party call. |
| System programming is required to enable or disable this feature. |
| • |
S-CO Button
Any flexible button can be customized as the S-CO button. |
| • |
Privacy Release Time
Privacy is released for five seconds to allow the conversation to be joined. |
| • |
This feature overrides Data Line Security (→ 1.4.1 Data Line Security) and Executive Busy Override Deny (→ 1.5.3 Executive Busy Override). |
1.13.15 PRIVATE NETWORK FEATURES
| A TIE line is a privately leased communication line between two or more PBXs, which provides cost effective communications between company members at different locations. The TIE lines can be used to call through the PBX to reach another switching system (PBX or telephone company). By using TIE lines, the PBX can support not only communications with the public network but with other company members in the private network where the PBX is included. |
|
Interface
|
| The following interfaces can be used to establish a private network: |
|
Interface |
Network Type | |
|
| Digital (64 kbps × 24 channels) |
| |
|
| |
|
|
|
| The available interfaces depend on the cards installed in the PBX. |
| 1. |
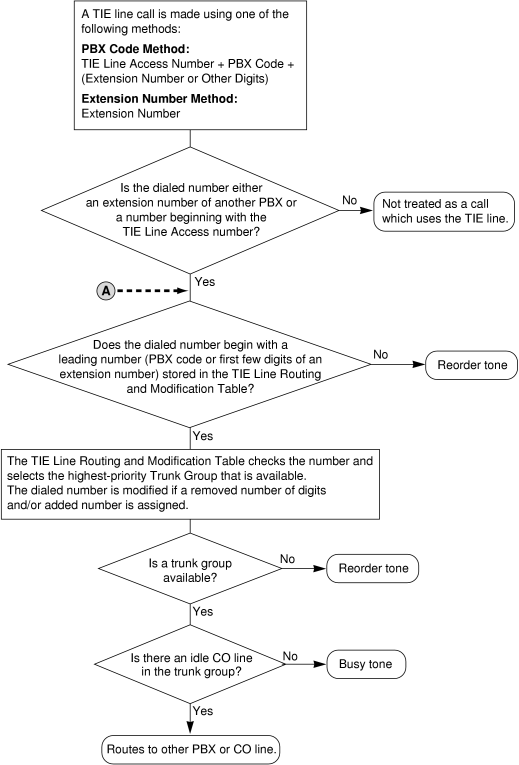
TIE Line Routing Flowchart |
|
|
[Making a TIE Line Call from an Extension] |
|
|
|
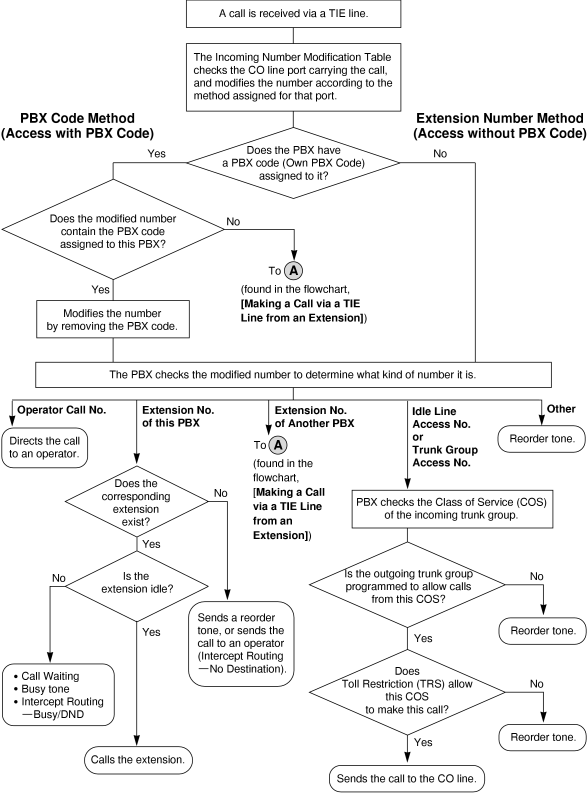
[Receiving a Call through a TIE Line] |
|
|
|
| 2. |
Making a TIE Line Call
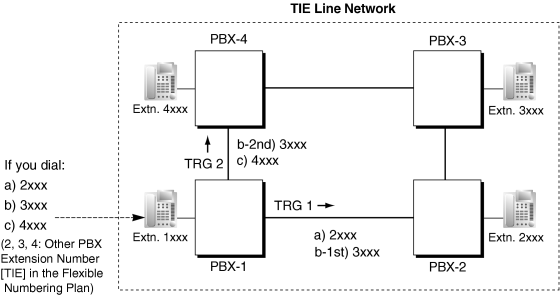
One of the following two methods can be used to make a TIE line call. |
|
| a) |
Extension Number Method (Access without PBX Code) |
|
| Dial the [Extension Number] only. |
|
[Example] |
|
|
Explanation:
To use this method, it is necessary to change the first one or two digits of extension numbers of either PBX (e.g., 10XX for PBX-1, 20XX for PBX-2) to allow calls to be routed properly. |
| Case 1: |
Extension 1012 of PBX-1 dials extension number "2011".
→ Extension 1012 of PBX-1 is connected to extension 2011 of PBX-2. |
|
| Case 2: |
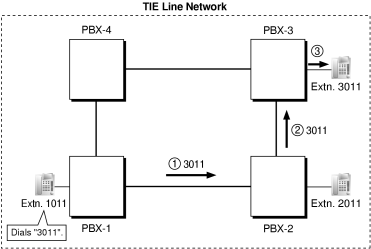
Extension 1011 of PBX-1 dials extension number "3011".
→ Extension 1011 of PBX-1 is connected to extension 3011 of PBX-3. |
|
|
| b) |
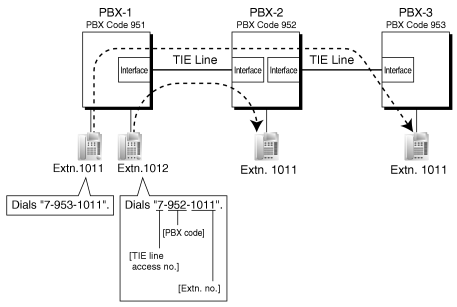
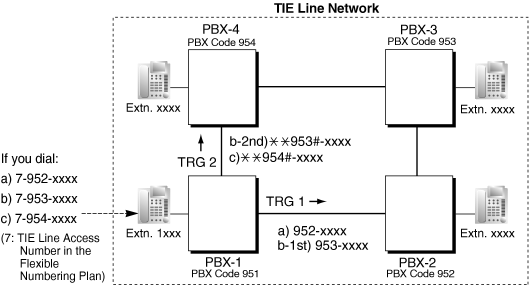
PBX Code Method (Access with PBX Code) |
|
|
|
| 3. |
TIE Line and CO Line Connection |
|
| To connect the TIE line with the CO line, the following patterns are available: |
| 1) |
CO Line-to-TIE Access |
| 2) |
TIE-to-CO Line Access |
| 3) |
CO Line-to-TIE-to-CO Line Access |
|
|
|
| 2.1 |
CO Line-to-TIE Access |
|
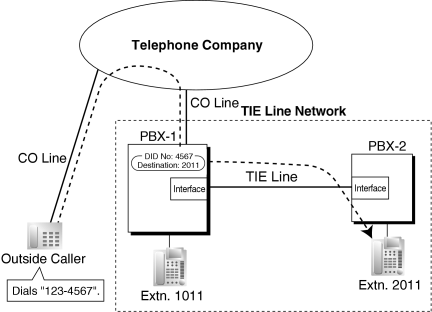
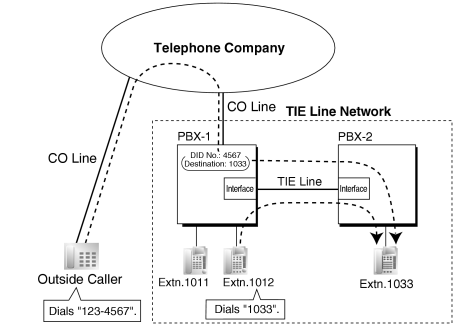
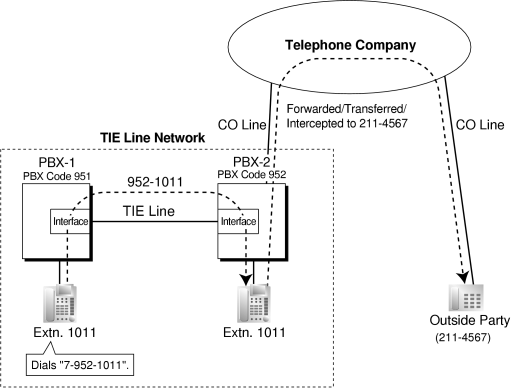
| It is possible to assign an extension of another PBX as the destination of incoming CO line calls to the own PBX. |
| It is also possible to forward calls using a virtual PS. Using this method, CO line calls received at PBX-1 are forwarded directly to the extension at PBX-2, even when using the PBX Code method. |
|
|
| a) |
Incoming CO Line Call Destination Assignment |
|
|
| b) |
FWD/Call Transfer/Intercept Routing to the TIE Line |
|
|
[Example] |
|
|
| Explanation: |
| An outside caller dials "123-4567". The call reaches the destination (extension 1011 of PBX-1), and the call is forwarded, transferred, or intercepted to extension "2011" of PBX-2 through the TIE line. |
|
|
| 2.2 |
TIE-to-CO Line Access |
|
The PBX sends TIE line calls to the CO lines of another PBX through the TIE lines.
|
|
|
| a) |
CO Line Call through Other PBXs—by Making a TIE Line Call Method |
|
| [Example] |
|
<Extension Number Method (Access without PBX Code)> |
|
|
| Explanation: |
|
|
| 1. |
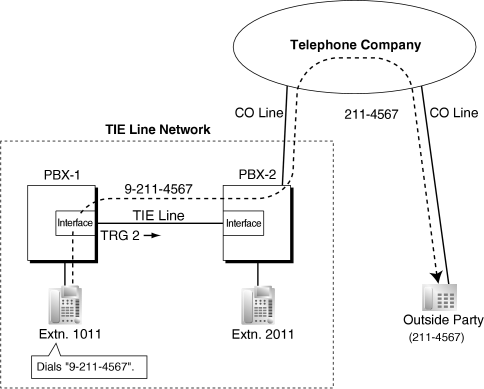
Extension 1011 of PBX-1 dials the Trunk Group Access number of PBX-1 "8", trunk group number "02" (TRG2), Idle Line Access number of PBX-2 "9", and telephone number "211-4567".
→ 2.9.9 [2-6-1] Numbering Plan—Main—Features— Trunk Group Access Trunk Group Access |
| 2. |
PBX-1 sends the call to PBX-2 through the trunk group (TRG) 2 (TIE line). |
| 3. |
PBX-2 sends the call to the outside party "211-4567". |
|
|
|
<PBX Code Method (Access with PBX Code)> |
|
|
| Explanation: |
|
|
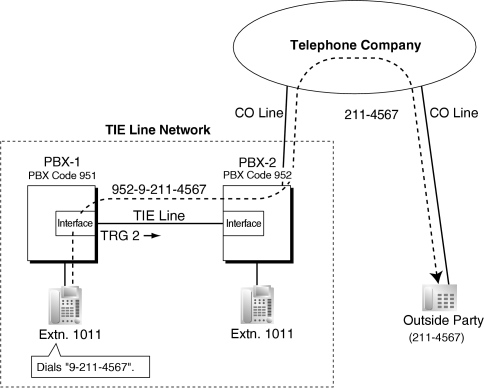
| 1. |
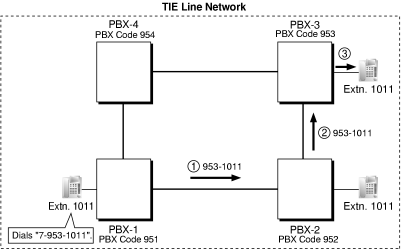
Extension 1011 of PBX-1 dials the TIE line access number "7", PBX code "952", Idle Line Access number of PBX-2 "9", and telephone number "211-4567"; or dials the Trunk Group Access number of PBX-1 "8", trunk group number "02" (TRG2), PBX code "952", Idle Line Access number of PBX-2 "9", and telephone number "211-4567". |
| 2. |
The call is connected to the outside party "211-4567" through PBX-2 which has PBX code "952". |
|
| b) |
CO Line Call through Other PBXs—by the ARS feature |
|
| [Example] |
|
<Extension Number Method (Access without PBX Code)> |
|
|
| Explanation: |
|
|
| 1. |
Extension 1011 of PBX-1 dials the Idle Line Access number of PBX-1 "9" and telephone number "211-4567". |
| 2. |
PBX-1 modifies the call (adds the Idle Line Access number of PBX-2 "9") and sends the call to PBX-2 through the TIE line (trunk group [TRG] 2) according to the ARS programming of PBX-1. |
| 3. |
PBX-2 sends the call to the outside party "211-4567". |
|
|
|
<PBX Code Method (Access with PBX Code)> |
|
|
| Explanation: |
|
|
| 1. |
Extension 1011 of PBX-1 dials the Idle Line Access number of PBX-1 "9" and telephone number "211-4567". |
| 2. |
PBX-1 modifies the call (adds "952" and the Idle Line Access number of PBX-2 "9") and sends the call to PBX-2 which has PBX code "952" through the TIE line (trunk group [TRG] 2) according to the ARS programming of PBX-1. |
| 3. |
PBX-2 sends the call to the outside party "211-4567". |
|
|
|
| c) |
Blocking CO line calls made through another PBX and how to override it: |
|
|
|
| [Example] |
|
<Extension Number Method (Access Without PBX Code)> |
|
|
| Explanation: |
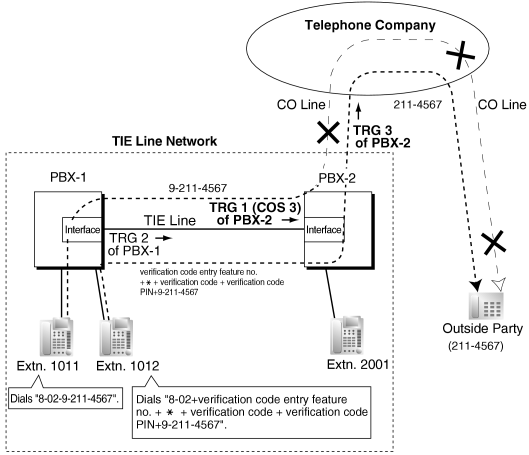
| Case 1: |
| 1. |
Extension 1011 of PBX-1 dials the Trunk Group Access number of PBX-1 "8", TIE line trunk group number (TRG 2), Idle Line Access number of PBX-2 "9", and the telephone number "211-4567". |
| 2. |
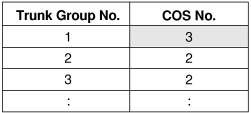
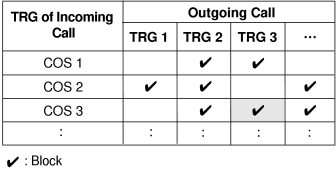
The call is not connected to the outside party through PBX-2 because the COS of TRG 1 (COS 3) is blocked from accessing TRG 3 of PBX-2. |
|
|
|
| Case 2: |
| 1. |
Extension 1012 of PBX-1 dials the Trunk Group Access number of PBX-1 "8", TIE line trunk group (TRG2), verification code entry feature number ,  , verification code, verification code personal identification number (PIN), Idle Line Access number of PBX-2 "9", and the telephone number "211-4567". , verification code, verification code personal identification number (PIN), Idle Line Access number of PBX-2 "9", and the telephone number "211-4567". |
| 2. |
If the specified verification code applies COS 2 of PBX-2, the call is connected to the outside party through PBX-2, because COS 2 is not blocked from accessing TRG 3 of PBX-2. |
|
|
|
|
<PBX Code Method (Access with PBX Code)> |
|
|
| Explanation: |
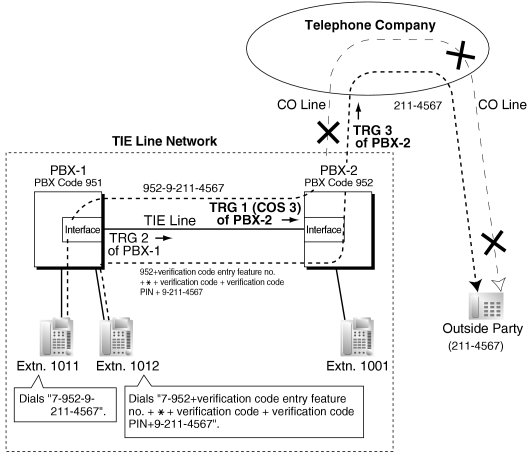
| Case 1: |
| 1. |
Extension 1011 of PBX-1 dials the TIE line access number "7", PBX code "952", Idle Line Access number of PBX-2 "9", and the telephone number "211-4567". |
| 2. |
The call is not connected to the outside party through PBX-2 because the COS of TRG 1 (COS 3) is blocked from accessing TRG 3 of PBX-2. |
|
|
|
| Case 2: |
| 1. |
Extension 1012 of PBX-1 dials the TIE line access number "7", PBX code "952", verification code entry feature number, , verification code, verification code personal identification number (PIN), Idle Line Access number of PBX-2 "9", and the telephone number "211-4567". |
| 2. |
If the specified verification code applies COS 2 of PBX-2, the call is connected to the outside party through PBX-2, because COS 2 is not blocked from accessing TRG 3 of PBX-2. |
|
|
| d) |
FWD/Call Transfer/Intercept Routing to the CO Line |
|
|
[Example] |
|
|
| Explanation: |
|
|
| 1. |
Extension 1011 of PBX-1 dials the TIE line access number "7", PBX code "952", and extension number "1011". |
| 2. |
The call reaches the destination (extension 1011 of PBX-2) through the TIE line, and the call is forwarded, transferred or intercepted to the outside party "211-4567" through the CO line. |
|
|
| 2.3 |
CO Line-to-TIE-to-CO Line Access |
|
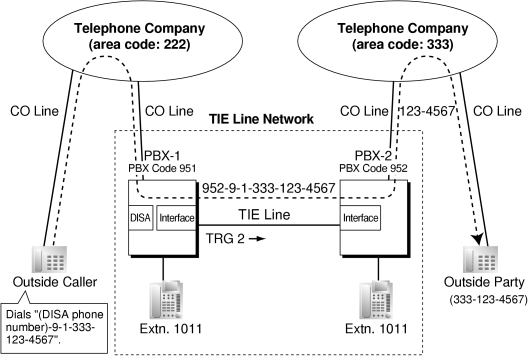
| An outside caller can be connected to an outside party through the TIE line by using the DISA feature. |
|
[Example] |
|
|
| Explanation: |
|
|
| 1. |
The outside caller dials the "DISA phone number of PBX-1", Idle Line Access number of PBX-1 "9", and telephone number "1-333-123-4567". |
| 2. |
PBX-1 modifies the call (adds "952" and the Idle Line Access number of PBX-2 "9") and sends the call to PBX-2 which has PBX code "952" through the TIE line (trunk group [TRG] 2) according to the ARS programming of PBX-1. |
| 3. |
PBX-2 sends the modified call to the outside party "333-123-4567" according to its ARS programming. |
|
|
| 4. |
TIE Line Routing and Modification Table |
|
| 3.1 |
To Make a TIE Line Call |
|
| The TIE Line Routing and Modification Table is referenced by the PBX to identify the CO line route when an extension user makes a TIE line call. |
| It is necessary to make unified tables with all PBXs in the TIE line network. |
| The routing pattern appropriate for each call is decided by the dialed number. |
| There are two system programs for the tables: |
TIE Line Routing Table: used to assign the leading numbers (PBX code or extension number) and trunk group hunt sequence.
→ 2.16.1 [9-1] TIE Table—Leading Number |
TIE Modify Removed Number of Digits/Added Number: used to remove digits from and add a number to the dialed number of the TIE line call. This modification may be needed depending on the TIE line network configuration.
2.16.1 [9-1] TIE Table
→ Removed Number of Digits
→ Added Number
→ Trunk Group |
|
| [Programming Examples] |
| Your PBX is PBX-1 and there are four PBXs in your TIE line network. To identify the CO line route as illustrated, you should make the following tables. |
|
|
| a) |
Extension Number Method (Access without PBX Code)
2.9.9 [2-6-1] Numbering Plan—Main—Other PBX Extension—Dial |
|
|
|
| [TIE Line Routing and Modification Table of PBX-1] |
|
Location No. |
Leading No. |
Priority 1 |
Priority 2 |
. . | |
TRG |
Dial Modification |
TRG |
Dial Modification |
. . | |
Removed No. of Digits |
Added No. |
Removed No. of Digits |
Added No. |
. . | |
|
|
|
|
|
|
|
|
| |
|
|
|
|
|
|
|
|
| |
|
|
|
|
|
|
|
|
| |
|
|
|
|
|
|
|
|
|
|
| Explanation: |
| Location 01: |
| The hunt sequence by dialing [2XXX]: |
The 1st route—trunk group (TRG) 1  Sending no. to PBX-2: 2XXX Sending no. to PBX-2: 2XXX |
|
| Location 02: |
| The hunt sequence by dialing [3XXX]: |
| The 1st route—trunk group (TRG) 1 Sending no. to PBX-2: 3XXX |
| The 2nd route—trunk group (TRG) 2 Sending no. to PBX-4: 3XXX |
|
| Location 03: |
| The hunt sequence by dialing [4XXX]: |
| The 1st route—trunk group (TRG) 2 Sending no. to PBX-4: 4XXX |
|
|
| b) |
PBX Code Method (Access with PBX Code)
→ 2.9.9 [2-6-1] Numbering Plan—Main—Features—TIE Line Access
→ 2.16.1 [9-1] TIE Table—Own PBX Code |
|
|
|
|
| [TIE Line Routing and Modification Table of PBX-1] |
|
Location No. |
Leading No. |
Priority 1 |
Priority 2 |
. . | |
TRG |
Dial Modification |
TRG |
Dial Modification |
. . | |
Removed No. of Digits |
Added No. |
Removed No. of Digits |
Added No. |
. . | |
|
|
|
|
|
|
|
|
| |
|
|
|
|
|
|
|
| 953# |
|
| |
|
|
|
|
| 954# |
|
|
|
|
| |
|
|
|
|
|
|
|
|
|
|
| Explanation: |
| Location 01: |
| The hunt sequence by dialing [7+PBX Code 952+XXXX]: |
| The 1st route — trunk group (TRG) 1 |
| Sending no. to PBX-2: 952–XXXX |
|
| Location 02: |
| The hunt sequence by dialing [7+PBX Code 953+XXXX]: |
| The 1st route — trunk group (TRG) 1 |
| Sending no. to PBX-2: 953–XXXX |
| The 2nd route — trunk group (TRG) 2 |
| Sending no. to PBX-4: 953#–XXXX |
|
| Location 03: |
| The hunt sequence by dialing [7+PBX Code 954+XXXX]: |
| The 1st route — trunk group (TRG) 2 |
| Sending no. to PBX-4: 954#–XXXX |
|
|
|
| 3.2 |
To Receive a TIE Line Call |
|
| a) |
Extension Number Method (Access without PBX Code) |
|
|
[Example] |
|
|
|
| A TIE line call is sent to PBX-2 from PBX-1. If the number sent from PBX-1 is an extension number of PBX-2 (e.g., 2011), the call will be received at extension "2011". If not, PBX-2 checks the number in the TIE Line Routing and Modified Table of PBX-2. |
| |
|
| If the match is found in the table, the call will be modified according to the table and send to the corresponding PBX (PBX-3). |
| |
|
| The number sent from PBX-2 "3011" is an extension number of PBX-3. The call is received at extension "3011". |
|
|
|
Note
|
When a TIE line call is sent from one PBX to another, the receiving PBX first modifies the received number according to the assignment for the CO line port: the number of digits removed, and the number added, are determined by this assignment. Then the PBX checks whether the completed number is an existing extension number at that PBX. |
|
|
| b) |
PBX Code Method (Access with PBX Code) |
|
|
[Example] |
|
|
|
| A TIE line call is sent to PBX-2 from PBX-1. If the number sent from PBX-1 has the PBX code of PBX-2 "952", the call will be received at the corresponding extension of PBX-2 (e.g., 1011of PBX-2). If not, PBX-2 checks the number in the TIE Line Routing and Modified Table of PBX-2. |
| |
|
| If the match is found in the table, the call will be modified according to the table and send to the corresponding PBX (PBX-3). |
| |
|
| The number sent from PBX-2 "953-1011" has the PBX code of PBX-3 "953". The call is received at extension "1011" of PBX-3. |
|
|
|
Note
|
When a TIE line call is sent to a PBX from another PBX, first the PBX modifies the number sent to the PBX according to the assignment for each CO line port of the PBX: the removed number of digits from and/or added number to the number sent to the PBX is determined by the assignment. Then the PBX starts to check the number whether the number has the PBX code of the PBX.
|
|
|
|
|
| • |
A CO line which is used for a private network should be assigned "Private" as the networking type. (→ 1.9.10 INCOMING CALL FEATURES) |
| • |
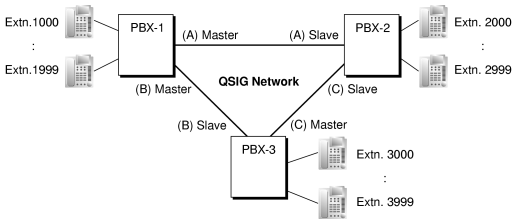
To establish a QSIG network (→ 1.13.20 PRIVATE NETWORK FEATURES—QSIG), each ISDN (QSIG) connection in a TIE line network must have the port on one PBX assigned as a master port, and the port on the other PBX assigned as a slave port. PBXs that support this feature are the KX-TDE series PBX and KX-TDA series PBX. |
|
|
[TIE Line Network Connection Example] |
|
|
| • |
TIE Line Call by Own PBX Extension Number
TIE line calls can be made using your own PBX extension numbering scheme (1–64). |
|
|
|
Explanation:
The PBX first searches local extensions for a matching number. If a dialed number is not found at the local PBX, the call can then be sent to a remote PBX, and the remote PBX checks the TIE Line Routing Table for a corresponding entry. |
| Case 1: |
Extension 1012 of PBX-1 dials extension number "1011".
→ The dialed number is found at the local PBX, and extension 1012 of PBX-1 is connected to extension 1011 of PBX-1. |
|
| Case 2: |
Extension 1012 of PBX-1 dials extension number "1033".
→ The dialed number is not found at the local PBX, so the call is redirected to the specified TIE Line, and extension 1012 of PBX-1 is connected to extension 1033 of PBX-2. |
|
| Case 3: |
A public CO line call directed to extension 1033 arrives at PBX-1.
→ The target extension number is not found at the local PBX, so the call is redirected to the specified TIE Line, and the call is connected to extension 1033 of PBX-2.
|
|
|
|
| – |
The KX-NCS4910 (Activation Key for Software Upgrade to Enhanced Version) is require to use this feature. |
| – |
System programming is required to enable this feature. |
| – |
If a dialed number is not found at a remote PBX, the call cannot be redirected to the local PBX to search for a matching number. |
|
| • |
When a TIE line call arrives at a busy extension which has disabled Call Waiting, the caller will hear a busy tone. If required, Intercept Routing can be activated. |
| • |
The Inter-digit time can be assigned for TIE line calls.
→ 2.9.5 [2-3] Timers & Counters—Miscellaneous—Incoming Call Inter-digit Timer—TIE |
1.13.16 Private Network Features—Centralized Voice Mail
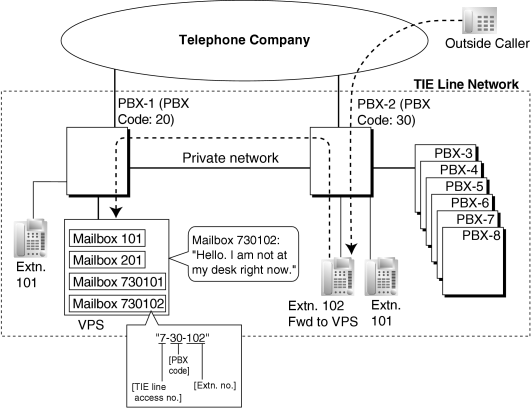
| Up to 8 PBXs connected in a VoIP or ISDN private network can share the services of a VPS connected to another PBX in DPT integration. This VPS can provide voice mail for extensions attached to any of the PBXs in the network, as if the VPS were connected to the local PBX. In addition, the VPS can send Message Waiting notifications to extensions at any PBX, and users can access their mailboxes directly using the Message Waiting button. |
| The VPS features available at extensions in a network are shown below. |
|
No. |
Feature |
Remote VPS |
Local VPS | |
|
| Automatic Configuration—Quick Setup |
|
|
| |
|
| FWD to a Mailbox of the VPS |
|
|
| |
|
| Intercept Routing to a Mailbox of the VPS |
|
|
| |
|
| Transferring to a Mailbox of the VPS |
|
|
| |
|
| Transfer Recall to a Mailbox of the VPS |
|
|
| |
|
| Listening to Recorded Messages (Direct Mailbox Access) |
|
|
| |
|
| VPS CO Line Service & Automatic Time Mode Notification |
|
|
| |
|
| Caller's Identification Notification to the VPS |
|
|
| |
|
| DID Number Notification to the VPS |
|
|
| |
|
| Status Notification to the VPS |
|
|
| |
|
|
|
| |
|
| Live Call Screening (LCS) |
|
|
| |
|
| Two-way Recording into the VPS |
|
|
| |
|
| VPS Data Control by the PBX |
|
|
| |
|
| Remote FWD Setting by the VM |
|
|
| |
|
|
|
| |
|
| Message clear on Check Out |
|
|
| |
|
| Voice message number display |
|
|
|
|
|
|
[CO Line Call Answered by the VPS, Transferred to Extension at Other PBX (Extension Number Method)] |
|
|
[Explanation]
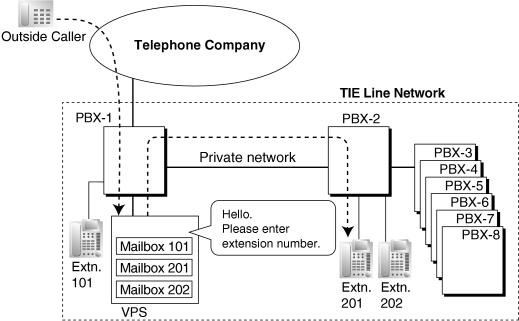
A CO line call is answered by the AA service of the VPS. The caller enters extension number 201, so the call is transferred over the private network to extension 201.
If extension 201 does not answer, mailbox 201 in the VPS will answer it and play the appropriate message. |
|
|
[CO Line Call to an Extension Not Answered, Forwarded to Mailbox (Extension Number Method)] |
|
|
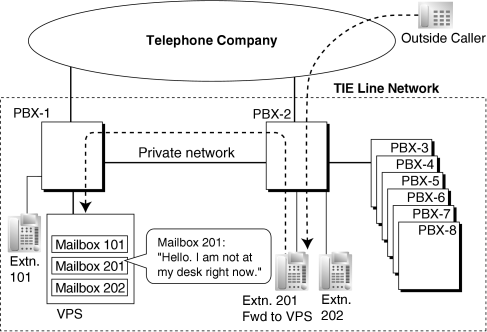
[Explanation]
Extension 201 does not answer the CO line call, so the call is forwarded to the VPS, and answered by mailbox 201. If the outside caller leaves a message, the VPS sends a Message Waiting notification to the extension using Enhanced QSIG information over the private network.
When forwarding the call, PBX-2 sends any received call information (Caller ID number/name, etc.) along with the VM trunk group number to use, applicable time mode, and extension number and forwarding reason of the original destination extension to PBX-1 as Enhanced QSIG information. |
|
PBX Code Method
|
|
|
[Explanation]
Extension 102 does not answer the CO line call, so the call is forwarded to the VPS, using a VPS mailbox number containing the TIE line access number, the PBX code of the PBX that received the call, and the extension number that received the call.
This mailbox number is the same as if an extension connected to PBX-1 called extension 102 of PBX-2. This mailbox number should be programmed as the mailbox number and owner extension number on the VPS. |
|
Multiple VPSs
|
| More than one PBX in the network can have a VPS connected, and each VPS can provide voice mail services for extensions connected to other PBXs in the network. |
| • |
The KX-NCS4910 (Activation Key for Software Upgrade to Enhanced Version) is required for the KX-TDE series PBX connected to the VPS, and for all KX-TDE series PBXs that will use this feature. |
| • |
All PBXs in the network must be KX-TDE or KX-TDA series PBXs. |
| • |
For information on the hardware requirements for KX-TDA series PBXs that share the same VPS, refer to the KX-TDA Feature Manual. |
| • |
Only KX-TVA series VPSs connected using DPT integration support this feature. |
| • |
Mailboxes for extensions connected to other PBXs in the network must be set up manually. |
| • |
An extension can receive Message Waiting notifications from multiple VPSs connected to PBXs in the network. When multiple notifications of the number of unheard messages in an extension user’s message box are sent from different VPSs, the most recent notification will be displayed. |
| • |
A flexible button cannot be customized as a Message Waiting button for another extension at a different PBX. |
| • |
Whether or not Enhanced QSIG information is transmitted can be set in the TIE table. |
| • |
When PBXs are connected by PRI23 cards, the card must be set to ISDN Standard mode. If set to T1 mode, the card must be removed and reinstalled to allow the mode to be changed. When the card is reinserted into the PBX, it is possible to choose whether the card will be set to T1 mode or ISDN Standard mode. The default is ISDN Standard. |
| • |
PBX Code Method
The number used in this method must be no more than 8 digits. |
| • |
When using a mailbox number containing more than 5 digits, the version of the KX-TVA series VPS must be 2.1 (Main Software Version 2.50) or later. |
| • |
Transfer to Mailbox
It is possible to transfer calls to a mailbox of a VPS at another PBX, by creating a flexible button containing the following:
[T] + extension number of VPS at other PBX + [P] + [#] + 6
Then, the extension user can transfer calls to a mailbox by pressing this key, entering the mailbox number, and going on hook. |
| • |
The VM Menu feature cannot be used in a Centralized Voice Mail network. When extensions belonging to a PBX that is not connected to the VPS have a mailbox in the VPS, the VM Menu feature should be disabled for the mailbox using the Class of Service (COS) setting of the VPS. Otherwise, there may be an answering delay of about 6 seconds. |
1.13.17 Private Network Features—NDSS (Network Direct Station Selection)
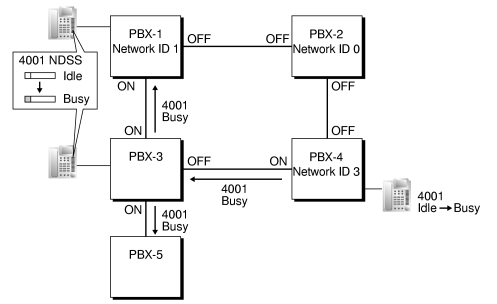
| When PBXs are networked using ISDN or IP-GW cards, it is possible to assign flexible buttons as Network Direct Station Selection (NDSS) buttons. These buttons are used to monitor the status of extensions connected to up to seven other PBXs in the network, and to make or transfer calls to those extensions with one touch, like normal DSS buttons. This allows operator functions to be centralized even when there are offices in remote locations. |
| NDSS buttons show the status of the monitored extension as follows: |
|
Light pattern |
Status | |
|
| The monitored extension is idle. |
| |
|
| The monitored extension is busy or has set DND for CO line calls. |
|
|
|
[Example Network] |

|
|
|
[Programming Procedure]
|
| 1. |
Routing Table Assignment
TIE Line Routing and Modification tables must have been programmed in advance for all PBXs in the network, to allow calls to be made and transferred between PBXs (→ 1.13.15 PRIVATE NETWORK FEATURES).
In the programming example that follows, the PBXs in the network use the Extension Number method, as shown in the illustration above. However, the PBX Access Code method can also be used. |
| 2. |
Network PBX ID Assignment
Assign a Network PBX ID to each PBX in the network.
→ 2.16.2 [9-2] Network Data Transmission—Network Data Transmission for Centralized Operator Feature—Network PBX ID |
|
| • |
IDs 1-8: Can monitor extensions at other PBXs, and transmit monitor data about local extensions. Each ID number can be assigned to one PBX within the network. |
| • |
ID 0: Retransmits monitor data throughout the network. This ID number can be assigned to multiple PBXs. |
|
| 3. |
QSIG Port Setting [Monitored PBX]
ISDN-QSIG (PBX Direct Connection)
Each QSIG port of a PRI card that will be used to transmit extension status information must be set to do so through system programming. Even if a port is set to not transmit information, it will still receive information from other PBXs.
→ 2.8.30 [1-1] Slot—Port Property - PRI Port—CO Setting—Networking Data Transfer |
| |
Transmit |
Extension Status Information Functions | |
|
| • |
Transmit information on own PBX extensions |
| • |
Receive information from other PBXs; forward it to other QSIG ports of the PBX |
| • |
Re-transmit information received by other QSIG ports of the PBX |
| |
|
| • |
Receive information from other PBXs; forward it to other QSIG ports of the PBX |
|
|
|
| Set the transmission setting for each port according to the layout of your network, so that extension status information can travel between NDSS monitor PBXs. |
|
[Example ISDN Network Port Setting] |
|
|
IP-GW-QSIG
IP data is routed through the network according to the routing tables of the IP-GW cards. When using VoIP, it is necessary to identify the monitor PBXs, to which to transmit extension status information, for each card that will be used. This is done by specifying the extension number of any extension (for example, the PBX operator) at the monitor PBX as a Network Operator extension for that IP-GW card. |
|
[Example VoIP Network] |

|
|
Mixed Network
When using the NDSS feature over a mixed network containing both VoIP portions and ISDN line portions, it is possible to set whether status information will be transferred between VoIP and ISDN cards within each PBX. For example, if the monitor PBX is on a VoIP network, and monitored PBXs are on an ISDN network, the PBX that acts as a gateway between the VoIP and ISDN networks must have this setting enabled for ISDN to VoIP. |
|
| 4. |
Network Monitor Extension Registration [Monitor PBX]
Register the extensions (attached to other PBXs) that will be monitored. A maximum of 250 extensions can be registered. Only extensions that have been registered here can be assigned to NDSS buttons.
→ 2.16.4 [9-4] NDSS Key Table—Network Extension No. |
|
| Network Monitor Extensions Table |
|
| |
Index No. |
Network Extn. No. |
Network Extn. Name | |
|
|
| |
|
|
| |
|
|
| |
|
|
| |
| | |
|
|
| When using the PBX Access Code numbering method, the relevant access code must be added before the extension number registered here. |
|
| 5. |
NDSS Button Customization [Monitor PBX]
At any extension attached to a monitor PBX, customize a flexible button as an NDSS button for an extension registered above. Then go off-hook, press this button once, and go on-hook again. This activates the monitoring function. The monitored PBX will begin to transmit information about the status of that extension, and the monitor PBX will begin to receive the information. The button light will display the status of the extension connected to another PBX. |
|
Removing or Editing a Registered Extension [Monitor PBX]
To monitor a new extension when 250 extensions are already being monitored, it is necessary to remove the registration of an existing extension. |
| The NDSS Monitor Release feature is used to stop monitoring a certain extension. When this feature is performed at a monitor PBX: |
| • |
If no other PBXs are monitoring the selected extension, the monitored PBX stops transmitting status information for that extension. |
| • |
The monitor PBX stops receiving status information for the selected extension. All NDSS buttons for that extension stop displaying status information. |
|
| However, the related information is not deleted from the Network Monitor Extensions Table. Therefore, if an extension user at a monitor PBX subsequently goes off-hook and presses the NDSS button for that extension, monitoring will be reactivated. To completely remove monitoring of an extension, the registration data must also be deleted from the Network Monitor Extensions Table at each monitor PBX. |
| The monitor destination of each NDSS button is determined by the registration information for a particular index number in this table. Therefore, if the registration information for an index number is changed (for example, the Network Extension Number assigned to Index No. 001 in the example above is changed from "2001" to "4002"), any NDSS buttons that have been set for that extension will automatically point to the new monitor destination. |
|
| • |
The KX-NCS4910 (Activation Key for Software Upgrade to Enhanced Version) is required for all KX-TDE series PBXs that will monitor extensions or have extensions monitored. |
| • |
Hardware Requirements:
If using an IP-GW4E card (KX-TDA0484), the firmware (not LPR) of the card must be version 1.2 or later. If using a PRI23 card (KX-TDA0290), the LPR software of the card must be version 1.009 or later. |
| • |
All PBXs in the network must be KX-TDE or KX-TDA series PBXs. For information on the hardware requirements for KX-TDA series PBXs that will monitor extensions or have extensions monitored, refer to the KX-TDA Feature Manual. |
| • |
Each of Network PBX IDs 1-8 can only be assigned to one PBX within a network. Assigning the same Network PBX ID to two PBXs will cause network data transmission problems. |
| • |
It is only possible to assign NDSS buttons for extensions that have been previously registered in the Network Monitor Extensions Table.
2.11.5 [4-1-4] Wired Extension—Flexible Button
→ Type
→ Dial (for NDSS)
2.11.13 [4-2-3] Portable Station—Flexible Button
→ Type
→ Dial (for NDSS)
2.11.17 [4-3] DSS Console
→ Type
→ Dial (for NDSS) |
| • |
Extensions connected to one PBX can monitor a maximum of 250 extensions at other PBXs. One extension can be monitored by multiple extensions at multiple PBXs. |
| • |
To reduce NDSS data traffic, it is recommended that 8 or less extensions in a single Incoming Call Distribution Group be monitored. |
| • |
Activation of an NDSS button is only required the first time that a button for a newly registered extension is created. Once an NDSS button has been activated by being pressed the first time, any further NDSS buttons for the same monitored extension will automatically display the extension status without needing to be activated. |
| • |
To use the NDSS Monitor Release feature, an extension must be assigned as a manager.
→ 2.9.12 [2-7-1] Class of Service—COS Settings—Extension Feature—Manager
→ [511] Manager Assignment |
| • |
Through system programming, it is possible to assign a maximum number of "hops" (transfers between PBXs) that extension status information can travel. Each time a piece of extension status information is forwarded to another PBX, its counter is increased by one. When this counter reaches the assigned maximum, the data is discarded. This is used to prevent data from circling unnecessarily around the network.
→ 2.16.2 [9-2] Network Data Transmission—Network Data Transmission for Centralized Operator Feature—Data Transmission Counter |
| • |
If it is not possible to remotely turn off transmission of extension status information using the NDSS Monitor Release feature because of network conditions, it is possible to perform the same operation directly through system programming at the monitored PBX.
→ 2.11.8 [4-1-6] Wired Extension—NDSS Link Data - Send
→ 2.11.15 [4-2-4] Portable Station—NDSS Link Data - Send |
| • |
When using a VoIP network, if extension status information is lost by the network, in some cases an NDSS button may not be able to display the status of the relevant extension. |
| • |
NDSS can not be used when two PBXs are networked using the TIE Line Call by Own PBX Extension Number feature (→ 1.13.15 PRIVATE NETWORK FEATURES). |
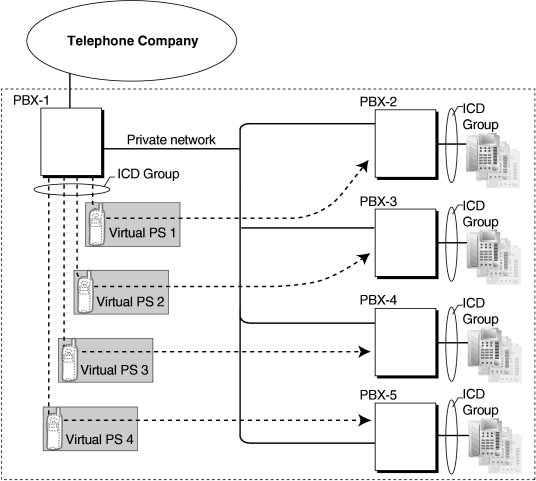
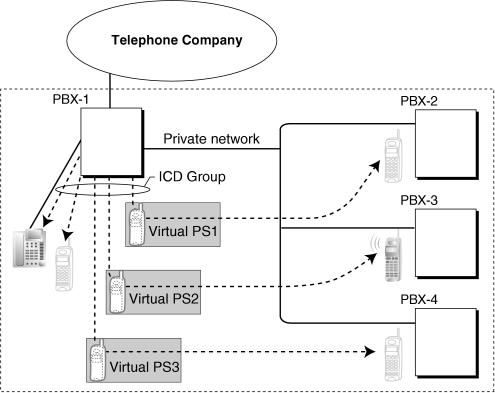
1.13.18 Private Network Features—Network ICD Group
| An Incoming Call Distribution (ICD) Group can include up to 4 destinations at other PBXs in a private network, including the floating extension number of another ICD Group. This is done by assigning a virtual PS as a member of the ICD Group, and then setting the number of a destination at another PBX as the forwarding destination for that virtual PS. This allows multiple ICD groups at remote locations to receive calls together. |
| • |
The KX-NCS4910 (Activation Key for Software Upgrade to Enhanced Version) is required for all PBXs that will support Virtual PSs. |
| • |
The conditions for 1.9.4 ICD Group Features—Outside Destinations also apply to this feature. |
1.13.19 Private Network Features—PS Roaming by Network ICD Group
| One PS can be registered to up to 4 PBXs in a private network, and a Network ICD group created for the PS at each PBX, with virtual PSs set to forward to the other PBXs in the network. When a call to the PS is received at one of the PBXs, the call rings simultaneously at all PBXs in the network to which that PS is registered. |
|
| Each virtual PS is set to forward calls to the extension number of the actual PS as registered at one of the other PBXs. |
| Then, an Incoming Call Distribution (ICD) Group is created containing the registered PS and the virtual PSs. |
| When a call is received at one of the PBXs, it is forwarded to all of the other PBXs. One private network channel is used to forward an incoming call to one other PBX. Therefore, if a PS is registered at 3 other PBXs, 3 private network channels are needed to forward a single call to all of the PBXs. |
| Each PBX can store the current communication status of each PS (In Range or Out of Range). If the status of the PS is set to Out of Range when a call is received, the call will be refused and the private network channel will be released immediately. Since the PS can only be set to In Range at a single PBX at one time, any other PBXs to which the call is transferred will refuse the call, releasing the VoIP or ISDN channels. |
| • |
The KX-NCS4910 (Activation Key for Software Upgrade to Enhanced Version) is required for all PBXs that will support Virtual PSs. |
| • |
If no signal is received from a PS for the preprogrammed length of time when an incoming call is received, the communication status of the PS is set to Out of Range, if enabled through system programming. |
| • |
When a PS comes within range of a certain PBX, Out of Range status is automatically released. However, in some negative wireless network conditions, Out of Range status may not be released automatically. In this case, the PS user can manually release Out of Range status by pressing the Talk key and confirming that a dial tone can be heard from the PBX. |
| • |
If the status of a PS is set to Out of Range at all PBXs that it is registered to, the call will be redirected to the overflow destination of the ICD Group. |
| • |
Handover from one PBX to another PBX during a conversation is not possible. |
1.13.20 PRIVATE NETWORK FEATURES—QSIG
| QSIG is a protocol which is based on ISDN (Q.931) and offers enhanced PBX features in a private network. The QSIG network supports private communications by the TIE line service method. |
The following features are available for an ISDN-QSIG or VoIP private network. For ISDN, system programming is required to specify whether each feature (excluding Calling Line Identification Presentation [CLIP]) is available for each port of the private network.
|
| [Standard Service Table] |
|
Service |
Description & Reference |
| Calling Line Identification Presentation (CLIP) |
|
|
| Connected Line Identification Presentation (COLP) |
|
|
| Calling Line Identification Restriction (CLIR) |
|
|
| Connected Line Identification Restriction (COLR) |
|
|
| Calling Name Identification Presentation (CNIP) |
|
|
| Connected Name Identification Presentation (CONP) |
|
|
| Calling Name Identification Restriction (CNIR) |
|
|
| Connected Name Identification Restriction (CONR) |
|
|
| Call Forwarding (CF)—by QSIG |
|
|
| Call Transfer (CT)—by QSIG |
|
|
| Completion of Calls to Busy Subscriber (CCBS)—by QSIG |
|
|
|
|
| [Enhanced Service Table] |
|
Service |
Description & Reference |
| Network Direct Station Selection (NDSS) |
|
| |
|
|
|
1.13.21 Private Network Features—QSIG—CCBS (Completion of Calls to Busy Subscriber)
| If the call has been made to an extension in another PBX in the QSIG network and the called party is busy, an extension user can set to receive callback ringing when the called party becomes free. When the user answers the callback ringing, that party's number is automatically dialed. |
| • |
This feature is available under the following conditions: |
|
| a) |
The caller's PBX is capable of using CCBS. |
| b) |
The called party's PBX is capable of accepting CCBS. |
|
| • |
For ISDN, receiving and sending CCBS must be enabled individually on an ISDN (QSIG) port basis through system programming. |
| • |
An extension user can set only one CCBS. The last setting is effective. |
| • |
The CCBS setting is canceled if there is no callback ringing within 60 minutes or callback ringing is not answered within 10 seconds. |
| • |
PC Programming Manual |
| • |
2.8.30 [1-1] Slot—Port Property - PRI Port—Supplementary Service—COLP, CLIR, COLR, CNIP, CONP, CNIR, CONR, CF (Rerouting), CT, CCBS, E911 |
| • |
2.8.45 [1-3] Option—New Card Installation—ISDN Standard Mode for PRI23 Card |
| • |
PT Programming Manual |
| • |
None |
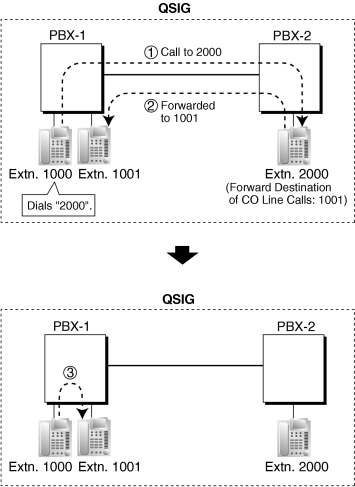
1.13.22 Private Network Features—QSIG—CF (Call Forwarding)
| The PBX forwards the call to a destination extension in another PBX in the QSIG network. The destination can be set on your own PBX on an extension basis as the forward destination of CO line calls (→ 1.6.6 FWD (Call Forwarding)). |
|
| If the same trunk group is used for the incoming call and the forwarded call, the following situation will be possible. |
|
[Example] |
|
|
|
| |
| Extension 1000 of PBX-1 dials extension number "2000", and the call is sent to extension "2000" of PBX-2 through QSIG network. |
| |
|
| The call is forwarded to the forward destination of CO line calls of extension 2000, which is extension "1001" of PBX-1. |
| |
|
| The call between PBX-1 and PBX-2 is released, and the call is connected directly to the forward destination of extension 2000. |
|
|
| • |
This feature can be enabled or disabled on each ISDN (QSIG) port of the PBX. |
| • |
PC Programming Manual |
| • |
2.8.30 [1-1] Slot—Port Property - PRI Port—Supplementary Service—COLP, CLIR, COLR, CNIP, CONP, CNIR, CONR, CF (Rerouting), CT, CCBS, E911 |
| • |
2.8.45 [1-3] Option—New Card Installation—ISDN Standard Mode for PRI23 Card |
| • |
PT Programming Manual |
| • |
None |
1.13.23 Private Network Features—QSIG—CLIP/COLP (Calling/Connected Line Identification Presentation) and CNIP/CONP (Calling/Connected Name Identification Presentation)
Calling Line Identification Presentation (CLIP) and Calling Name Identification Presentation (CNIP):
The PBX can send a preprogrammed extension number and/or name to the QSIG network when an extension user makes a call. The called party can see the number and/or name on his telephone display before answering the call. |
Connected Line Identification Presentation (COLP) and Connected Name Identification Presentation (CONP):
The PBX sends a preprogrammed extension number and/or name to the QSIG network when the extension user answers an incoming call. The caller can see the number and/or name of the answering party on his telephone display when the call is answered. |
|
[CLIP/CNIP Example] |
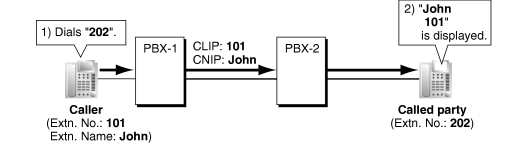
|
|
|
[COLP/CONP Example] |
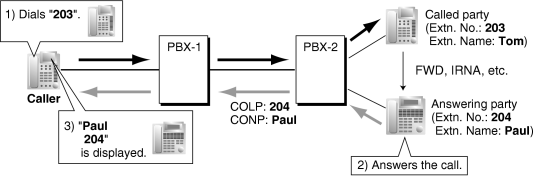
|
|
CLIP/COLP Number:
The extension number sent to the QSIG network for CLIP/COLP can be assigned for each extension through system programming. |
CNIP/CONP Name:
The extension name sent to the QSIG network for CNIP/CONP can be assigned for each extension through system programming.
|
Calling/Connected Line Identification Restriction (CLIR/COLR):
It is possible for each extension to restrict the sending of its extension number to the QSIG network by pressing the CLIR button, COLR button, or entering the feature number. |
Calling Name Identification Restriction (CNIR) and Connected Name Identification Restriction (CONR)
It is possible for each extension to restrict the sending of its extension name to the QSIG network. When CLIR is activated, CNIR becomes active automatically. When COLR is activated, CONR becomes active automatically. |
| • |
COLP/CLIR/COLR/CNIP/CONP/CNIR/CONR Assignment for Each Port
Each service can be enabled or disabled on each ISDN (QSIG) port of the PBX. |
| • |
CLIR Button and COLR Button
It is possible to switch between CLIP and CLIR by pressing the CLIR button, and COLP and COLR by pressing the COLR button. A flexible button can be customized as the CLIR or COLR button. |
| • |
PC Programming Manual |
| • |
2.8.30 [1-1] Slot—Port Property - PRI Port—Supplementary Service—COLP, CLIR, COLR, CNIP, CONP, CNIR, CONR, CF (Rerouting), CT, CCBS, E911 |
| • |
2.9.9 [2-6-1] Numbering Plan—Main—Features |
| • |
→ COLR Set / Cancel |
| • |
→ CLIR Set / Cancel |
| • |
2.11.1 [4-1-1] Wired Extension—Extension Settings—Main |
| • |
→ Extension Number |
| • |
→ Extension Name |
| • |
2.11.10 [4-2-1] Portable Station—Extension Settings—Main |
| • |
→ Extension Number |
| • |
→ Extension Name |
| • |
PT Programming Manual |
| • |
[003] Extension Number |
| • |
[004] Extension Name |
1.13.24 Private Network Features—QSIG—CT (Call Transfer)
| The PBX transfers the call to a destination extension in another PBX in the QSIG network. |
|
| If the same trunk group is used for the incoming call and the transferred call, the following situation will be possible. |
|
[Example] |
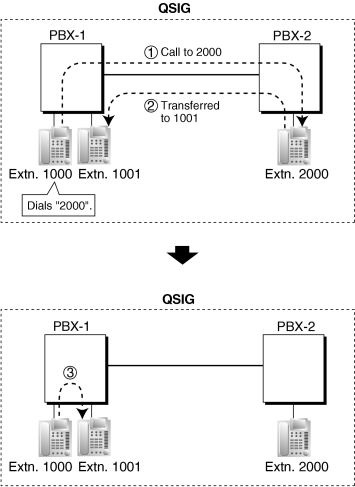
|
|
|
| |
| Extension 1000 of PBX-1 dials extension number "2000", and the call is sent to extension "2000" of PBX-2 through QSIG network. |
| |
|
| The call is transferred from extension 2000 to extension "1001" of PBX-1. |
| |
|
| The call between PBX-1 and PBX-2 is released, and the call is connected directly to the transfer destination of extension 2000. |
|
|
| • |
This feature can be enabled or disabled on an ISDN (QSIG) port basis. |
| • |
Call Transfer with Announcement and Call Transfer without Announcement is possible
(→ 1.3.9 Call Transfer). |
| • |
PC Programming Manual |
| • |
2.8.30 [1-1] Slot—Port Property - PRI Port—Supplementary Service—COLP, CLIR, COLR, CNIP, CONP, CNIR, CONR, CF (Rerouting), CT, CCBS, E911 |
| • |
2.8.35 [1-1] Slot—Card Property - IP Gateway—QSIG-CT |
| • |
2.8.45 [1-3] Option—New Card Installation—ISDN Standard Mode for PRI23 Card |
| • |
PT Programming Manual |
| • |
None |
1.13.25 Private Network Features—VoIP (Voice over Internet Protocol)
The PBX can connect to another PBX via a private IP network. In this case, voice signals are converted into IP packets (VoIP) and sent through this network.
VoIP networks support private network communications using TIE line service.
|
|
[Example] |
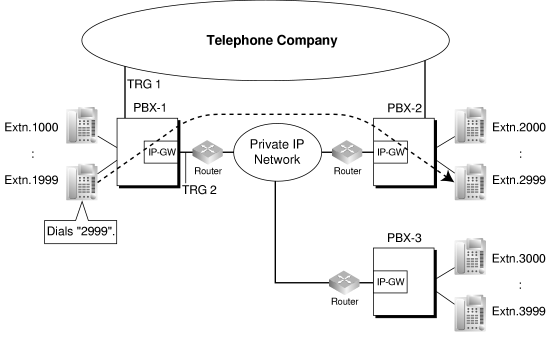
|
|
| Required Programming |
| • |
PBX |
|
For making a call:
ARS programming (→ 1.1.3 ARS (Automatic Route Selection)) or TIE line service programming |
For receiving a call:
TIE line service programming |
| [TIE Line Routing and Modification Table] |
|
Location No. |
Leading No. |
Priority 1 |
Priority 2 |
. . | |
TRG |
Dial Modification |
TRG |
Dial Modification |
. . | |
Removed No. of Digits |
Added No. |
Removed No. of Digits |
Added No. |
. . | |
|
|
|
|
|
|
|
|
| |
|
|
|
|
| | |
|
| |
|
|
|
|
|
|
|
|
|
|
[Explanation]
Calls to destinations with leading number "2" or "3" are automatically routed through the VoIP ports, designated as trunk group 2. |
|
|
| • |
IP-GW |
|
| IP address assignment for the local PBX and other PBXs. |
[Programming Example]|
Destination | |
Leading No. |
IP Address | |
|
| |
|
| |
|
| |
[Explanation]
Calls are routed to the IP address of each IP-GW card based on the leading number dialed. |
|
|
|
|
Gateway Groups
|
| It is possible to automatically reroute outgoing VoIP calls according to preassigned gateway groups. |
| When using the V-IPGW16 card, a gateway device can be assigned a gateway group number, based on its IP Address. When a call is made using a leading number allocated to a gateway group, it is routed to the lowest-numbered available device within that group. In other words, if the lowest-numbered device is busy or not available, the call slides to the next available device. |
|
[Example] |
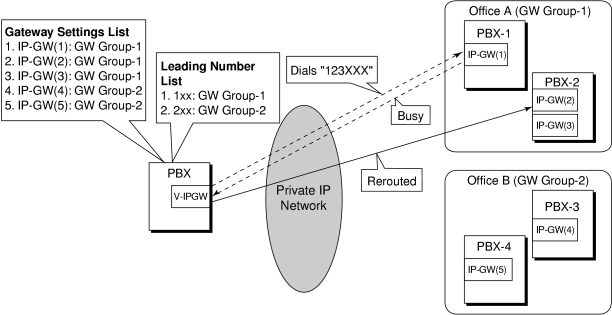
|
|
| When "123XXX" is dialed, the call is routed to GW Group-1. However the lowest-numbered device (IP-GW(1)) is busy or not available, so the call is rerouted to IP-GW(2). |
|
Automatic Rerouting of VoIP Calls to Public CO Lines
|
| When a VoIP call cannot be completed successfully, the PBX can automatically attempt to make the call using a public CO line instead. This provides a backup method of making calls in cases when IP network transmission cannot be completed successfully. |
|
[Example] |
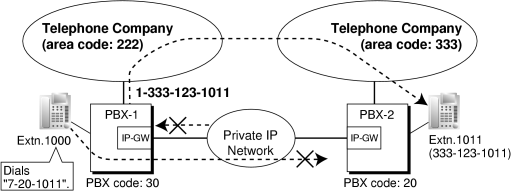
|
|
| The leading numbers of extensions accessed through the VoIP network are added as entries to the Quick Dialing table, in addition to being registered as Other PBX Extension Numbers, as shown below: |
Number to dial to call an extension at another PBX using VoIP network:
7 (TIE line access number) + 20 (PBX Code) + 1011 (extension number) |
Number to dial to call that extension using a public CO line:
9 (CO line access number) + 1-333-123-1011 |
[Quick Dialing Table]|
Quick Dialing No. |
Destination No. | |
|
| |
| If the call cannot be completed using the VoIP network, and the dialed leading number is found in the Quick Dialing Table, the call will be automatically rerouted to a CO line and as specified by the corresponding destination number. |
| When a call is made using the VoIP network, if the PBX does not receive a reply from the other PBX within about 4 seconds of making the call, or an error is returned, the call is rerouted to a public CO line as specified. |
|
Sending Faxes Through the Network
|
Through system programming, it is possible to select whether faxes are sent using analog or T.38 protocol signals.
To use T.38 protocol signals, the program software file version of the installed DSP card must be 56.000 or later. |
1.13.26 PS Connection
| A Panasonic portable station (PS) can be used in place of a proprietary telephone (PT), providing wireless access to PBX features and call handling. |
| Cell Stations (CSs) allow PSs to receive reception within a designated area. |
| 1. |
Registration |
|
|
| 2. |
Connection |
|
There are two ways a PS can be used.
|
| As an Extension |
| A PS is assigned its own extension number when it is registered to a PBX. The PS can use this extension number to make and receive calls, just as a wired telephone can. A PS can be a member of an incoming call distribution (ICD) group, can be assigned as the destination for redirected calls, etc., just as a wired telephone can. |
| A PS can also be a member of a PS ring group (→ 1.13.29 PS Ring Group). A PS ring group is a way for several PSs to be notified of an incoming call simultaneously, but does not offer all of the features provided by an ICD group. (→ 1.9.1 ICD GROUP FEATURES) |
|
| In Wireless XDP Parallel Mode |
| A PS can share an extension number with a wired telephone, allowing extension users to use their PSs when they are away from their desks to answer or make calls as if they were using their wired telephones. (→ 1.20.5 Wireless XDP Parallel Mode) |
|
| 3. |
PS Interaction with CS |
|
| Each PS communicates with the PBX wirelessly through a cell station (CS). Each CS is connected to the PBX and sends and receives radio waves to and from different PSs within its range, using different channels for different PSs. Each CS has three channels, i.e., up to three calls (conversations) can be handled simultaneously by one CS. |
| A PS must be within range of a CS in order to be used, however, multiple CSs can be used with the same PBX to offer a greater area of wireless coverage. Additionally, a PS does not need to be used with a specific CS; any PS can communicate with any CS provided the PS is registered to the PBX, and provided the CS has at least one channel available. |
|
| Handover |
| If a PS is within range of more than one CS, the PS will communicate with the CS which has the greatest signal strength and an available channel. When a PS user moves out of range of one CS and moves in range of another CS, the PS will "hand over" its communications to the new CS. Handover is possible when: |
|
|
| a) |
The PS is on an intercom call or on a call with an outside party. (The call will not be disconnected during the handover.) |
| b) |
A call is ringing at the PS. (The call will continue to ring after the handover.) |
| c) |
The PS is in idle status (i.e., waiting to receive calls).
|
|
|
|
[Example of Handover] |
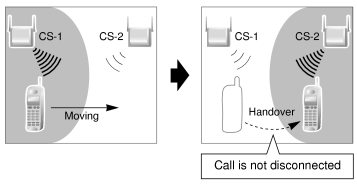
|
|
| Handover is not possible when the PS is: |
|
|
| a) |
Not within range of another CS. |
| b) |
Within range of another CS but that CS is busy. |
| c) |
Screening a call via Live Call Screening (LCS) or recording a call via Two-way Record (→ 1.19.4 Voice Mail DPT (Digital) Integration) |
| d) |
Paging other extensions. (→ 1.13.1 Paging) |
| e) |
On a doorphone call. |
| f) |
Dialing digits to make a CO line call. |
| g) |
On a call with an extension which is recording the conversation via PC Console or PC Phone. |
|
| • |
If every CS that a PS is in range of is busy when that PS is called, the call will not be connected and the caller will hear a busy tone. |
| • |
A PS can only be assigned an extension number of 4 digits or less. |
1.13.27 PS Directory
| A portable station (PS) user can make a call or access PBX features using information stored in the PS and PBX. |
| Refer to the Operating Instructions supplied with your PS for available directories and usage. |
|
Directory Type |
Description |
Programming | |
|
| A list of names and telephone numbers. Used to make a call to one of the stored parties. |
|
| Stored in the PS by the PS user. |
| |
|
| A list of frequently dialed feature numbers as well as names and telephone numbers. Used to quickly access one of the stored features, or quickly make a call to one of the stored parties. |
|
| Stored in the PS by the PS user. |
|
| System Speed Dialing Directory |
|
| A system-wide list of names and telephone numbers. Used to make a call to one of the stored parties. |
|
|
| PBX Extension Dialing Directory |
|
| A system-wide list of extension names. Used to make a call to one of the stored extensions. |
|
|
|
1.13.28 PS Feature Buttons
| Although a portable station (PS) does not feature as many buttons as a proprietary telephone (PT), a PS can be customized to give a PS user access to PBX features, just as the flexible buttons on a PT can be customized. (→ 1.6.3 Flexible Buttons) |
1.13.29 PS Ring Group
| A PS ring group is a way for several portable stations (PSs) to be notified of an incoming call simultaneously, while using only one channel of a cell station (CS). |
| Normally when a PS receives a call, one channel of a CS is used to ring the PS (→ 1.13.26 PS Connection). If several PSs are members of an incoming call distribution (ICD) group, the available channels of a CS will become busy just by ringing each PS. Assigning a group of PSs to a PS ring group alleviates this strain on the CS because only one channel is needed to ring a PS ring group's members. |
| PS ring group members and related parameters are assigned through system programming, as explained below. |
| a) |
Floating Extension Number: When this number is called, all PSs in the group ring. |
| b) |
Group Name: Can be displayed on a ringing PS to indicate that the incoming CO line call is a group call, and not a call directed to the PS's extension number. This is only available when Incoming CO Line Call Information Display is set to "Called Number". |
| c) |
Incoming CO Line Call Information Display: Determines which information is shown on the PS display when a group call is received. Select "Caller ID" to display the caller's telephone number or name, or "Called Number" to display the name of the PS ring group which is receiving the call. |
| d) |
Member PSs: Select each PS that will be a member of the corresponding PS ring group. Note that a PS can belong to more than one PS ring group.
|
|
|
[Programming Example: PS Ring Group] |
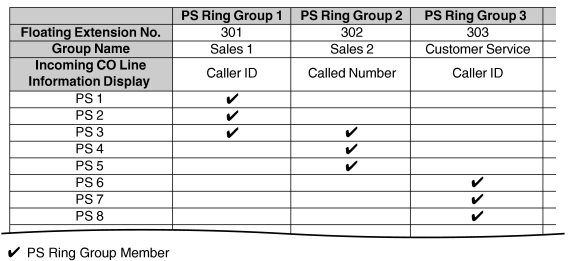
|
|
|
[Example of PS Ring Groups 1 and 2] |
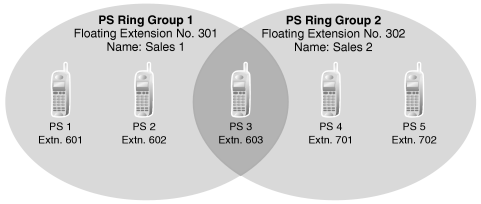
|
|
| Explanation: |
PS Ring Group 1
PS 1, PS 2, and PS 3 will ring simultaneously when a call is directed to floating extension number 301, and, in the case of a CO line call, will display the Caller ID information for the call.
These PSs will ring individually when a call is directed to their assigned extension numbers (programming not shown here).
|
PS Ring Group 2
PS 3, PS 4, and PS 5 will ring simultaneously when a call is directed to floating extension number 302, and, in the case of a CO line call, will display "Sales 2".
These PSs will ring individually when a call is directed to their assigned extension numbers (programming not shown here). |
|
|
ICD Groups vs. PS Ring Groups
|
| Assigning PSs to either an ICD group or a PS ring group will allow multiple PSs to receive group calls simultaneously. The differences between the two are highlighted below: |
|
Features |
PS Ring Group |
ICD Group |
| Members can ring simultaneously when a call is received |
|
|
|
| Calls can be distributed to member extensions using different methods |
|
|
|
| The CS is less likely to be busy; ringing all member PSs uses only one CS channel |
|
|
|
| Members can log-in, log-out, and use Wrap-up time, ICD Group button |
|
|
|
| Both PTs and PSs can belong to the same group |
|
|
|
| Each member can belong to more than one group |
|
|
|
| Calls can wait in a queue if they cannot be answered |
|
|
|
|
|
[Example of CS Channels Used for PS Ring Group Calls and ICD Group Calls] |
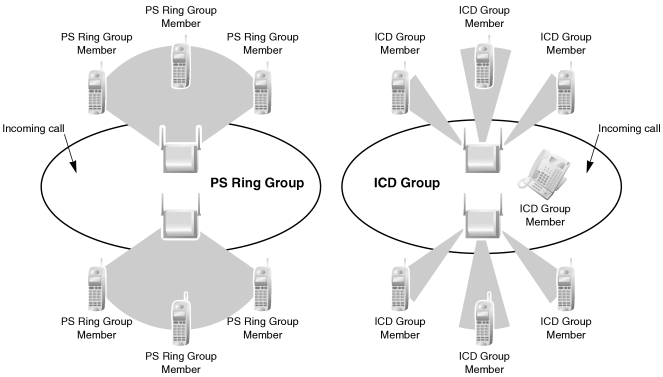
|
|
| Explanation: |
| The PS ring group has six members which are in range of two different CSs. When a call arrives, each CS uses one channel to ring all member PSs within its range. |
| The ICD group has one proprietary telephone (PT) member, as well as six PS members which are in range of two different CSs. When a call arrives, each CS uses three channels to ring each of the member PSs within its range. |
| • |
A maximum of 32 PS ring groups can be programmed. |
| • |
Each member of a PS ring group must be a PS, but each member does not need to be in range of the same CS. When a call is directed to a PS ring group, all CSs connected to the PBX will try to ring members of the group. |
| • |
PS ring groups do not have Log-in or Log-out features. There is no way for a PS to log-in to or log-out from a PS ring group. |
| • |
A PS ring group may be assigned as a member of an ICD group, but the PS ring group cannot log-in to or log-out from an ICD group. The PS ring group (and therefore its members) will always be logged-in. |
| • |
When a PS is assigned to a PS ring group, the following settings are used if it receives a call directly, but are disregarded when it receives a group call: |
|
| a) |
Delayed Ringing (All PSs will ring simultaneously.) |
| b) |
The incoming call display preference assigned to the PS through system programming. |
| c) |
Features set on the PS, such as Call Forwarding (FWD). Note, however, that if a PS user has set Do Not Disturb (DND), that PS will not ring for group calls either. |
|
| • |
When a call is directed to a PS ring group, the PBX will try to ring the group's members regardless of whether or not they are already on another call. If all members of a PS ring group are busy when the group is called, their PSs will not ring but the caller will hear a ringback tone. |
| • |
A PS ring group will only ring one call at a time on its member PSs. If a PS ring group is ringing one call when another call is directed to the group, the group will appear busy to the caller. If a call is directed to a specific PS within the group in this situation and the PS is available to answer calls, the PS will ring as usual. |
| • |
The PBX will ring calls for only two PS ring groups at a time. In other words, if two calls directed to two different PS ring groups are ringing, no other PS ring group calls will ring until one of the other ringing calls is answered. |
| • |
If a PS in a PS ring group has set the DND feature for CO line calls, the PS will not ring for CO line calls as well as intercom calls directed to the group. |
| • |
Compatible PSs
The following PSs can be assigned to PS ring groups: |
|
| – |
KX-TD7680 |
| – |
KX-TD7684 |
| – |
KX-TD7685 |
| – |
KX-TD7690 |
| – |
KX-TD7694 |
| – |
KX-TD7695 |
|
1.13.30 PT Programming
| A proprietary telephone (PT) can be used to customize the settings of the PBX or of an extension, using the following programming features: |
|
Programming Type |
Description |
Example |
Authorized Programmer | |
|
| Used by an extension user to customize the extension's settings. |
|
| PT Display Language, Call Waiting Tone, etc. |
|
| |
|
| Used by an authorized party to customize the PBX. |
|
| Intercept Destination, ARS Mode, Date and Time, etc. |
|
| Authorized administrator or extension user |
| |
|
| Used by an extension assigned as a manager to customize the current state of an extension, or to grant special privileges temporarily to an extension user. |
|
| Switching the current time mode, Remote Extension Dial Lock, Remote PIN Clear, etc. |
|
| Extension assigned as a manager |
|
|
| • |
Class of Service (COS) programming determines the level of programming an extension user is authorized to perform: |
|
| – |
System programming and personal programming |
| – |
Personal programming only |
| – |
No programming may be performed |
|
| • |
The extension which is connected to the lowest numbered port on the card installed in the lowest numbered slot can perform both personal programming and system programming regardless of the extension's COS. |
| • |
COS programming determines which extensions are manager extensions and can therefore perform manager programming. |
| • |
During programming, the PT is considered to be busy and will not receive calls. |
| • |
Only one system programming (including PC programming) or manager programming session is permitted at a time, i.e., these two programming features cannot be performed simultaneously by two users. The maximum number of simultaneous programmers that each PBX supports is as follows: |
|
| – |
one system programmer + 63 personal programmers |
| – |
one manager programmer + 63 personal programmers |
| – |
64 personal programmers |
|
| • |
System Programming Password Level
To access system programming, a valid password must be entered. For more details, see Section 1.13.3 Password Security. |
| • |
Personal Programming Data Reset
A PT user can return settings made through personal programming (Preferred Line Assignment, Live Call Screening Mode, etc.) to their default settings all at once. |